
Table of contents
- Beta testing (late 2017)
- Introduction
- Pre-requisites
- Workflow overview
- Instructions
- Login and start
- Document
- Publish
Beta testing (late 2017)
If you’re reading this, you’re probably a modeling center liaison or model realm expert participating in the beta testing–thank you! For the rest of 2017, ES-DOC is seeking beta tester reviews of the model documentation process described on this wiki. Additionally, the model properties themselves (the model specializations, also known as the model CV) are in the final stage of community review, so this is a double beta-test opportunity!
As you try out the model documentation process, please look for needed improvements to the
- Model document interface/methods
- Model document instructions (this page, or something else)
- Model/science properties to document
Please send your comments and feedback on the model document interface and model description documentation to David Hassell.
The science content of the CMIP6 model documentation will be released 1st January 2018. The current model properties are visible throughout this beta test exercise and available on the ES-DOC specializations page. Please provide feedback on the links on the bottom of that page.
Additionally, please note that not all functionality is available currently, or some functionality is different than it will be during production. Differences due to beta testing will be pointed out in bold.
If you’re a modeling center liaison, please help your realm experts complete the notebooks or obtain the responses from them offline and then complete the notebooks yourself. Printing the notebooks on paper may be the most convenient for some (ES-DOC may provide a more printer-friendly PDF- stayed tuned), while others may be comfortable with Jupyter notebooks.
Introduction
Participating CMIP6 models should be documented in two complementary locations.
- In a peer-reviewed journal (usually Geoscientific Model Development), which will serve as the definitive source of model information as well as often including additional information such as comparison studies, analysis figures, and discussion. The article’s citation will be referenced within the model output’s netCDF global attributes and from ES-DOC.
- Within ES-DOC (an improved descendant of the CMIP5 METAFOR project), which records CMIP6 metadata in a common format. While the traditional peer-reviewed model documentation paper is essential, many data users don’t have subscription journal access, and the article text doesn’t lend itself to tabular view of model properties and comparison among models. For example, using the ES-DOC Model Comparator one can quickly visualize differences among two or more models. (At present only CMIP5 models are compared, but CMIP6 models will become available when their descriptions are completed.) For CMIP6, ES-DOC will create a similar web tool to create publication-ready tables summarizing details of one or more models.
The following instructions are intended to help model center liaisons and model realm experts document their models using ES-DOC.
Pre-requisites
Your ES-DOC liaison (or you, if you are the liaison) should complete these preliminary steps (Steps 1, 2, and 3.2 on the ES-DOC liaison checklist).
- Obtain a JupyterHub login and password for your institution
- Complete the configuration file to initialize (pre-fill out or seed) the model descriptions based on a CMIP5 model, a CMIP6 model, or a blank document.
- Email David Hassell that you’re ready
Workflow overview
Model documentation should be completed for each participating CMIP6 model using the Jupyter notebooks input method described here.
- The model documentation input method is composed of a number of Jupyter notebooks, a web-based code form that resides on the ES-DOC JupyterHub server. Each modeling center will be given a login and password to access the JupyterHub server, and will be able to edit and run (validate and publish) only their notebooks.
- Each model’s documentation is divided by realm, plus top-level properties. So for each model, there are N+1 notebooks to complete, where N is the number of realms simulated by the model. Each CMIP6 model has top-level properties and at most eight other realms, listed in the model specializations page.
- Each Jupyter notebook may be blank, or initialized by a CMIP5 or CMIP6 model. Blank and initialized-from-CMIP5 notebooks are immediately available. Notebooks set to initialize from a CMIP6 model are only available once the desired source CMIP6 model is published. The modeling center’s ES-DOC liaison is responsible for completing the initialization configuration, after consultation with the rest of the modeling group.
- The ES-DOC liaison may choose to help realm experts complete the notebooks, or to collect the responses from the realm experts offline (e.g. printing out the notebooks on paper) and then fill out the notebooks herself. Either way, the notebooks auto-save, so the notebooks may be completed over time by different people.
- Each notebook contains a number of questions. Each question is either optional or mandatory, and the response has a prescribed format: e.g. true/false, enumerated choices, free-form text, integer, etc.
- When ready to publish, run the notebook. Any errors will be reported at the bottom. Errors will result from not answering mandatory questions or providing a response inconsistent with the expected format. If there are no errors, your responses will be available on the DRAFT section of the ES-DOC Viewer within an hour (This won’t yet work during the beta testing)
- The notebooks may be run and published multiple times, with a version number automatically incremented.
- The initial quality control state is Draft; published results will appear on the DRAFT section of the ES-DOC Viewer. When the modeling center decides the a model’s documentation is ready to be permanently published, the liaison contacts David Hassell, and after a period of time, the documentation will be permanently available on the Viewer.
- If corrections are needed to the published model documentation, the notebooks may be edited again. When run, the results will again appear on the DRAFT section of the ES-DOC Viewer. After coordinating with David, the corrected version will be available on the Viewer. (The latest version will be visible first but older versions are also available from the drop-down menu).
Instructions
Login and start
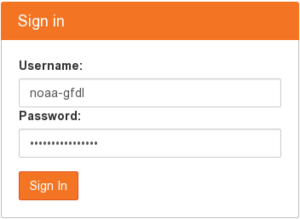
- Login to JupyterHub server
- Open the JupyterHub URL address in a new web tab or window
- In the Sign in box, enter your institution’s login and password (ask your ES-DOC liaison if you don’t have it)
- Navigate file / directory structure
- After logging in, you’re able to navigate directory trees and start notebooks. Your home directory will contain just one directory, called notebooks.
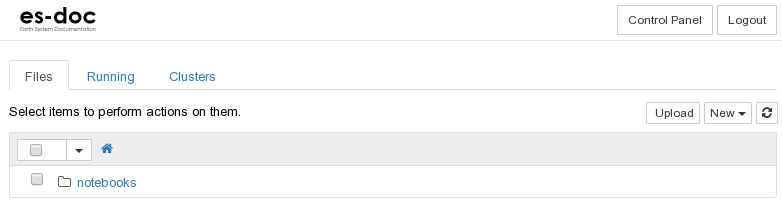
- Click the notebooks directory to change directory into it. Navigating through the JupyterHub directories is similar to other file navigation interfaces. Click the “..” listing to return to the parent directory, or click the home icon above that to return back to the home directory.
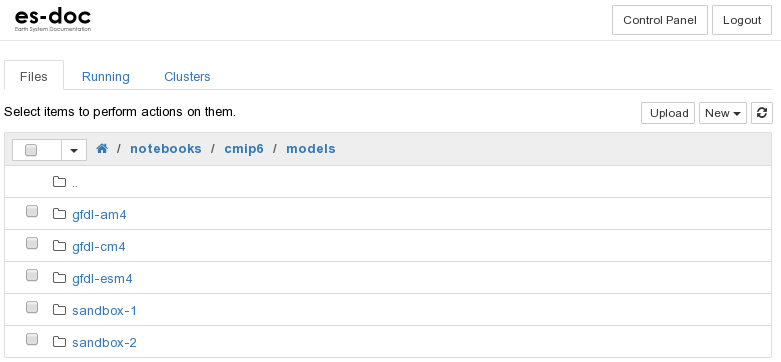
- Enter the cmip6 and the models directories. You should see your institution’s registered CMIP6 models. During beta testing, sandbox-1 and sandbox-2 are sample blank notebooks.
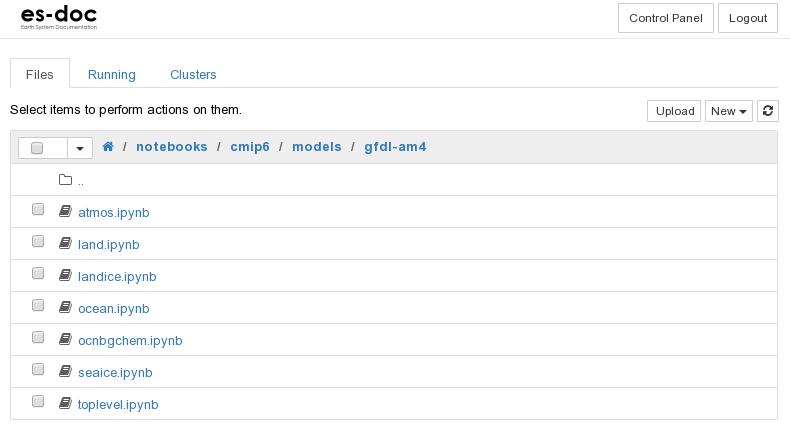
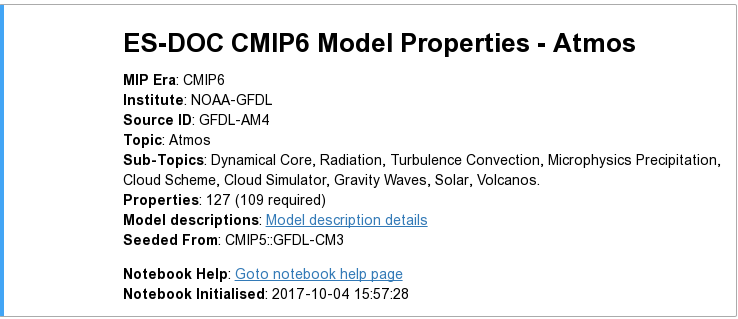
- Click one of your models to see available notebooks for that model. In this case, there are 7 notebooks: 6 realms and a top-level. There are 8 CMIP6 realms in total, so there will be a maximum of 9 notebooks available. If there are less than 9, some of the realms may not be simulated by the model, or the realms may be configured to be initialized from a CMIP6 model that isn’t published yet. During beta testing, notebooks that are configured to be seeded from CMIP6 models will be visible as blank notebooks; during production these notebooks will not exist until the seeded target is published. Examining the configuration file describing the seeding may help explain. GFDL’s configuration file is here; in general, GFDL has set GFDL-AM4 to seed from the CMIP5 model GFDL-CM3, GFDL-CM4 to seed from GFDL-AM4, and GFDL-ESM4 to seed from GFDL-CM4.
- After logging in, you’re able to navigate directory trees and start notebooks. Your home directory will contain just one directory, called notebooks.
- Open a notebook by clicking one of the available realms (or top-level). The notebook will open a new tab (it takes a few seconds to start), leaving the JupyterHub directory navigation tab open in the background.
Document
- Examine notebook structure
- The summary section at the top contains details such as institution and model names, how many total and mandatory questions in the form, and which model it was initialized from.
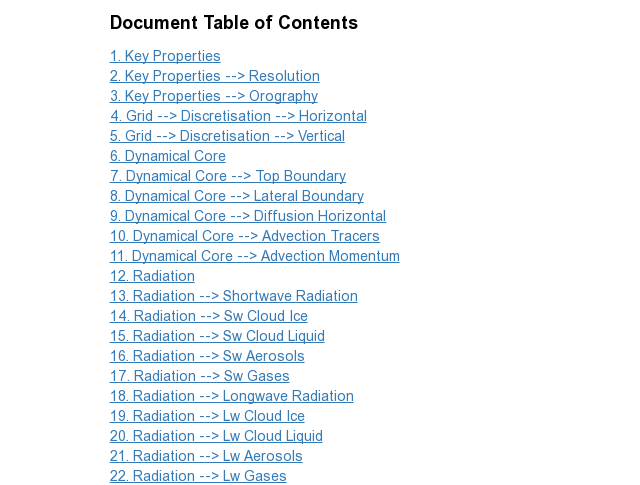
- Below that, the Table of Contents describes the layout of the model properties to be documented. The questions are divided by Process (e.g. Dynamical Core, Radiation) and sometimes divided further by Subprocess (e.g. Dynamical Core::Top Boundary, Raditation::Sw Cloud Ice). The sections in the Table of Contents are shortcut clickable links as well.
- Below the Table of Contents are the questions / model properties to document.
- The summary section at the top contains details such as institution and model names, how many total and mandatory questions in the form, and which model it was initialized from.
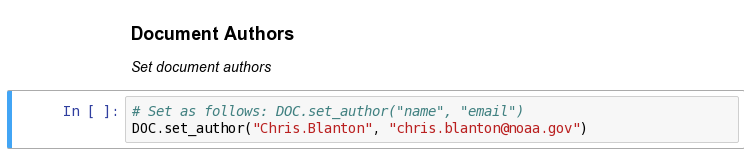
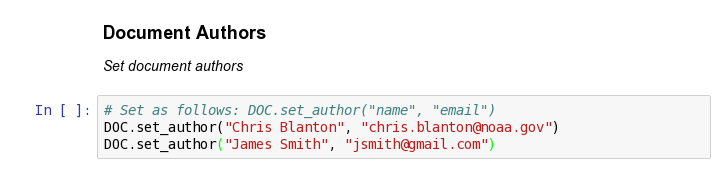
- Add your name to the Author question at the top of the notebook.
- Initially, the document contains a blank template, with “TODO” to indicate requested input.
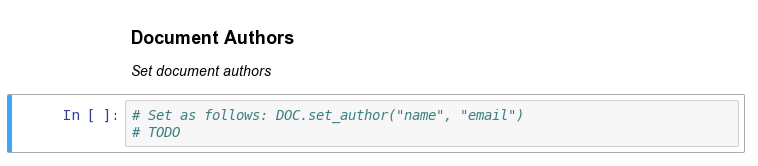
- Add your name using the suggested commented syntax, replacing the “TODO” blank line.
- Additional authors can be added using the same syntax on subsequent lines.
- Initially, the document contains a blank template, with “TODO” to indicate requested input.
- Fill out responses. The question can be either mandatory (Is Required: True) or optional (Is Required: False). The requested response will be of one of the follwing types: free-form text (Type: String), yes or no (Type: Boolean), integers (Type: Integer), floats (Type: Float), or a choice among options (Type: Enum). Most questions expect a single answer (Cardinality: 1.1 or 0.1 for a mandatory or optional response respectively) while some allow more than one answer (Cardinality: 1.N or 0.N for at least one or or at least zero responses respectively). For questions that allow multiple answers, specify additional responses on additional lines.
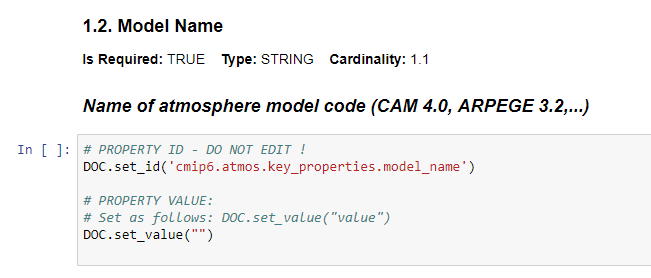 To answer the question, replace the commented TODO line with the suggested commented Set as follows line. For example,
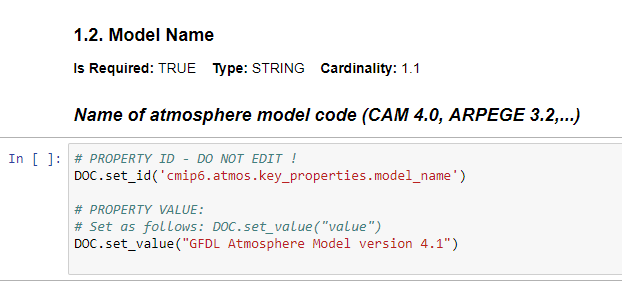
- Validate notebook. Validation runs the notebook, and verifies that mandatory questions are answered and that the responses conform to the expected information types (string, boolean, enumerated choices).
- (During beta testing, this doesn’t work yet.) Click the Validate button at the top, which will run the notebook and verify that mandatory questions are answered and the expected responses conform to the expected. You’ll see a validation report containing the results at the bottom of the notebook.
- Validation is not truly testable yet. Currently, only “loose” validation is enforced, meaning expected response types (string, boolean, enumerated choices) are checked, but not answering mandatory questions is allowed. Additionally, the Validate button doesn’t exist yet. To try out the validation as is, go to the Kernel menu at the top and select Restart & Run All. Validation errors will only appear below the line of the violation, not repeated at the bottom.
Publish
- Draft publish notebook. Note: during current beta testing, this doesn’t work yet.
- Set the publication flag near the top the notebook to 1
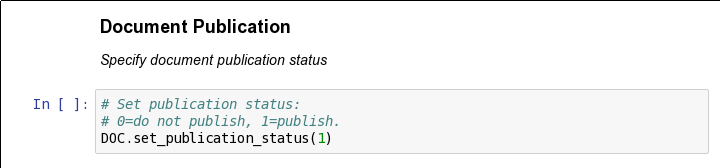
- Click the Publish button at the top. This will first validate the notebook, and assuming no validation errors, will publish the documentation to the DRAFT section of the ES-DOC Viewer. Check the bottom of the notebook for the results of what was just done.
- Set the publication flag near the top the notebook to 1
- Examine results using ES-DOC Viewer
- Repeat steps for all notebooks
- Quality control of responses. The model realm experts should review all questions for each model.
- Production publish notebook. When a model is ready for permanent publication, the liaison should email David Hassell. After an exchange and a short waiting period, the documentation will be permanently published and available on the ES-DOC Viewer.